 Time Web Services - Help
Topics
- What is TWS?
- Online Documentation
- Quick Start Kit
- Online Interface Overview
- Basic Code Samples
- Troubleshooting
- Endpoint Sunsetting
What is TWS?
The Time Web Services (TWS) API - is designed to allow external systems to connect with the Stratustime SASS engine. The API has multiple methods to import and export data out of its
data store. The TWS API is designed for end users to consume and send data via XML/JSON/SOAP.
Online Documentation
When using the online interface you will have access to every web services layout structure and schema by clicking on the help tab for every web service. However, for a detailed run-down
of all the properties for a given web service you can visit the online documentation for an overview of the property definitions.
Quick Start Kit
The TWS Quick Start Kit is designed to help get you connected to the API quickly. Inside you will find several examples for interacting with the TWS Web API.
With minimal adjustments you should be able to cut and paste many of the code samples to get you up and running relatively quick.

Online Interface Overview
TWS is composed of 3 different web service URLs. Users can use any language they want to interact with the TWS API, as long as the languages use JSON/XML/SOAP as the standard for sending and receiving the data. The layout is defined as: https://centralservers.com/service/ws-[Standard]/[Version].Below are the service URLs that can currently be used.
- https://centralservers.com/service/ws-xml/2.0
- https://centralservers.com/service/ws-json/2.0
- https://centralservers.com/service/ws-soap/2.0
- https://centralservers.com/service/ws-xml/1.0
- https://centralservers.com/service/ws-json/1.0
- https://centralservers.com/service/ws-soap/1.0
*Note: In the event an endpoint is not available in 2.0, use an endpoint that is available in 1.0.
Interfacing with the Library Interface
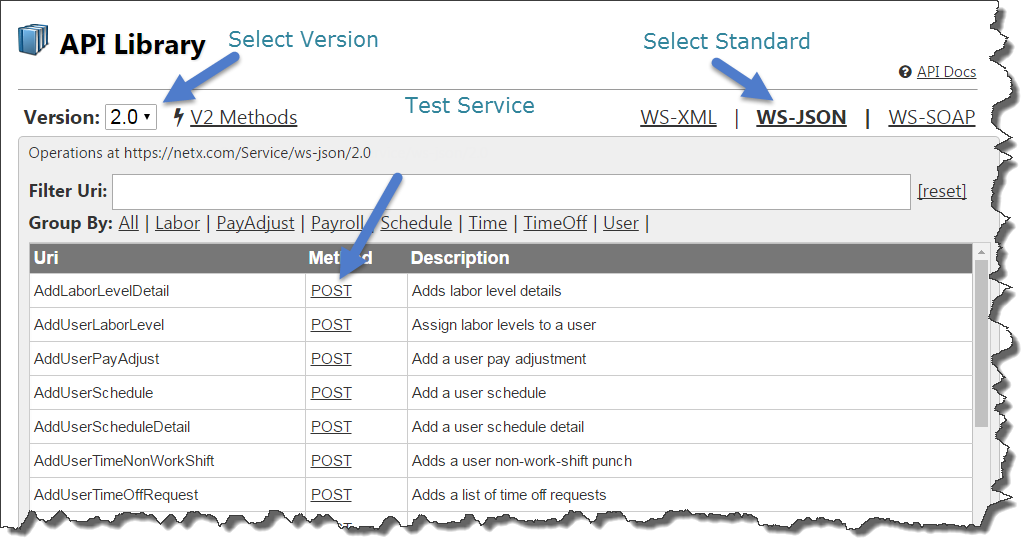
The main library interface is designed to help end users rapidly view and test the data that is required to construct communications with the available web services. Figure 1-1 shows the main areas of the library interface.
In order to test a Web Service click on any one of the method links to open a "Service Test Form Dialog".
Testing a Web Service
When a user opens a "Service Test Form Dialog" they are presented with a visual interface into the URI web method. This interface will help describe the general layout of the web service and present a form to test the web service.
The test tab contains the inputs for submitting and receiving web service requests. The Help tab will help explain the schema and layout of the web service call.
Before a web service can be interacted with you must have created a secure token. The next section provides more details on creating a security token. The token field must be populated with a valid token and can be saved by clicking
the Save link. Some web service methods such as PUT and POST require that a payload be sent. For XML and JSON standards you can click the XML or JSON payload links to create a template of the web service. Clicking the submit
button will send the request.
Note: When Working with SOAP requests please use the SOAP UI Interface for testing.
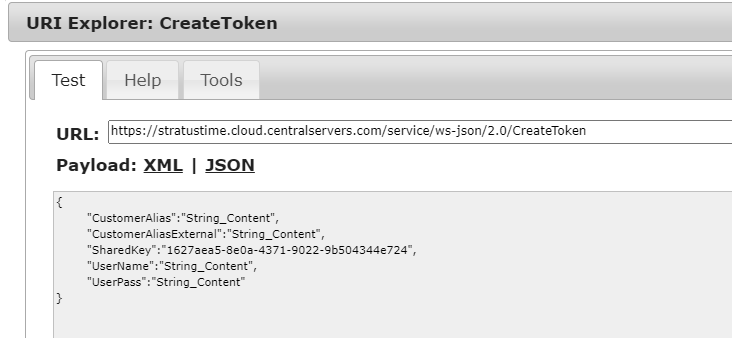
Creating an Authorization Token
Before any communication can take place with the TWS a security token must be established. The web service method used to create the secure token is called "CreateToken" below is the following JSON format used to send as the POST payload for the token."CustomerAlias":"{{CLIENT_ALIAS}}",
"SharedKey":"{{WS_KEY}}",
"UserName":"{{WS_USER}}",
"UserPass":"{{WS_PASSWORD}}"
}
Using this JSON payload with the request URL https://centralservers.com/service/ws-json/2.0 with return and security token that looks something like this.
Once the token is generated it can be placed in the Token field and saved for the duration of using the Library UI testing tool. In order to use the token programmatically it will need to be placed in the HTTP request header and sent as part of the HTTP request. Below are some examples of calling the library from code:
Basic Code Sample
Note: If you're looking for SOAP example code please download the Software Developers Kit and try it out. Reference the API documentation.
    using System;
    using System.IO;
    using System.Net;
    using System.Web.Script.Serialization;

    /// <summary>
    /// Connect to the TWS API
    /// </summary>
    public class TWSConnector
    {

    /// <summary>
    /// Sends to TWS.
    /// </summary>
    public void SendToTWS()
        {
    //JSON data can be constructed as an object or a string directly
    //string PostData = {"Client":"[YOUR-CLIENT-NAME]",    "Pass":"[YOUR-PASS]",    "User":"[YOUR-ADMIN-NAME]"}
            JavaScriptSerializer ser = new JavaScriptSerializer();
    var jsonData = new Token()
            {
                "CustomerAlias":"{{CLIENT_ALIAS}}",
                "SharedKey":"{{WS_KEY}}",
                "UserName":"{{WS_USER}}",
                "UserPass":"{{WS_PASSWORD}}"
            };

    string ResponseData = string.Empty;


    //A valid URL layout to the the TWS service  centralservers.com/service/<b>ws-[Standard]/[Version]
    string HttpURL = "http://centralservers.com/ws-json/2.0/CreateToken";

    //GET/PUT/POST/DELETE
    string HttpMethod = "GET";

    //Types: xml/text or json/text
    string HttpContentType = "";

    //Send data if request required it
    string PostData = ser.Serialize(jsonData);

    //Example token.  This is need for all requests except TokenCreate
    string Token = "7uR7UX1eXeOSYAMG+o8Ip3r9mXGeavDliR7rZn0c1+qBHc7copXVBtSEAwYTcgnud8HlXXg7UoqmBA6M845Ot3HH2ZB...";

    try
            {
    var webReq = (HttpWebRequest)WebRequest.Create(HttpURL);
                webReq.Method = HttpMethod;
                webReq.ContentType = HttpContentType;

    //Required Header item for connection to API
                webReq.Headers.Add("Auth-Token", Token);

    if (HttpMethod != "GET")
                {
    using (var sw = new StreamWriter(webReq.GetRequestStream()))
                    {
                        sw.Write(PostData);
                        sw.Flush();
                        sw.Close();
                    }
                }

    var httpResponse = (HttpWebResponse)webReq.GetResponse();
    using (var sr = new StreamReader(httpResponse.GetResponseStream()))
                {
    //Use this data as needed
                    ResponseData = sr.ReadToEnd();
                }
            }
    catch (Exception ex)
            {
    //Handle Exception Here
            }
        }
    }

    //Stub class for any and all object types.
    public class Token
    {
    public string Client { get; set; }
    public string Pass { get; set; }
    public string User { get; set; }
    }
Troubleshooting
On occasion in the development of an application to communicate with the API’s it will be necessary to ask our support team for assistance
(for many reasons, including for example: how to call a specific method, or an error that is being received). To expedite the research and resolution of issues
our support team will often ask you to provide a payload so that they can narrow down / and replicate the issue. If you are utilizing a tool which automatically
generates a SOAP request it can sometimes be difficult to do this. This tutorial will focus on one such method of capturing the payload: using the Fiddler application.
Endpoint Sunsetting
As with all software there is a process in which portions of the code must be retired. Below is a quick overview for how endpoints will be retired/sunset in the TWS system.
- Before an endpoint is flagged as SUNSET it will normally be in the OBSOLETE state for no shorter than 6 months. endpoints are set as SUNSET once we have determined that very little to no traffic is hitting the endpoint. If your company is making use of any of the OBSOLETE methods we strongly encourage you to begin moving away from that method to its new counterpart which should be mentioned in both the API library and the API docs.
-
Once the endpoint is flagged as SUNSET we will add logic to the endpoint to return an error message if a call is still attempted.
The message will look like:
    {
    "ErrorCode": "SUNSET ENDPOINT",
    "Message": "This endpoint has been Sunset and will be completely removed soon!  Please update to the version 2 implementation of this endpoint.
        In order to temporarily re-enable the endpoint add the following property 'EnableSunsetEndpoint=true' to the endpoints input parameter.
        For more details please see the online documentation for this endpoint.  For additional support please contact the support desk."
    }
If for some reason a client has tried to use the endpoint during its sunset period, they will temporarily be able to enable the call with an override parameter. This parameter will allow for the endpoint to temporarily work until it is removed. - The endpoint will be left in SUNSET mode for about 2-6 weeks as we monitor it and work with clients if needed. At the end of the 2-6 week cycle the endpoint we will remove it completely. These notices will also be updated in the main API docs.
- If for any reason, you find that your company is still making use of a SUNSET endpoint, please let our support desk know immediately so that we can keep the endpoint online until the necessary updates can be made on the client end to point to the newer version.